
What to Do When Pipes Freeze?
Water has the exclusive characteristic of expanding when it freezes. Whatever is confining it, such as metal or plastic pipes, is put under great pressure as a result of this expansion. No matter how sturdy the container, pipes can break due to expanding water.
The most often frozen pipes are:
- Pipes are subject to extreme cold, such as sprinkler lines, pool supply lines, and outdoor hose bibs.
- Water supply pipes in internal, non-heated locations such garages, basements, attics, or kitchen cabinets.
- Pipes that are located near exterior walls with insufficient or no insulation.
What Happens When Pipes Freeze?
Well everyone wants to know about what happens when pipes freeze. Here is the answer that water increases by 9% in volume when it freezes. When this occurs in a closed pipe, the ice pushes the water out, which exponentially raises the pressure. The pipe will explode if this is allowed to continue for too long.
Reduced or absent flow from a toilet, shower, or faucet, is one of the first indications of a frozen pipe. If pipes are observable, swelling or frost are further reliable signs of a frozen pipe.
What Temperature Do Pipes Freeze and Frozen Pipe Repair?
Follow these suggestions to prevent your pipes from freezing before the winter weather arrives:
- In accordance with the installer’s or manufacturer’s instructions, drain water from the supply pipes for sprinklers and swimming pools. If not instructed, do not add antifreeze to these lines. In addition to being hazardous to the environment, antifreeze is also detrimental to people, wildlife, pets, and landscaping.
- Look around the house for any further locations where water supply lines may be found in chilly places. Look behind kitchen and bathroom cupboards, as well as in the garage. These regions need to have insulated hot and cold water lines.
- Hoses used outside should be taken out, drained, and stored. Close the internal hose bib supply valves. To let the water drain, open the exterior hose bibs. Keep the outer valve open to allow any water that is still inside the pipe to expand without breaking it.
- Attics, crawl spaces, and basements should all have insulation. Higher temperatures will be maintained in these places through insulation.
- Move exposed pipes if you want to strengthen their protection against freezing.
- Consider putting in “pipe sleeves” or covering exposed water pipes with “heat cable,” “heat tape,” or other insulation goods that are UL-listed. Even ¼” of newspaper can offer significant protection in regions where temperatures below freezing are not often frequent or prolonged. Newspaper can offer some degree of insulation and protection to exposed pipes.
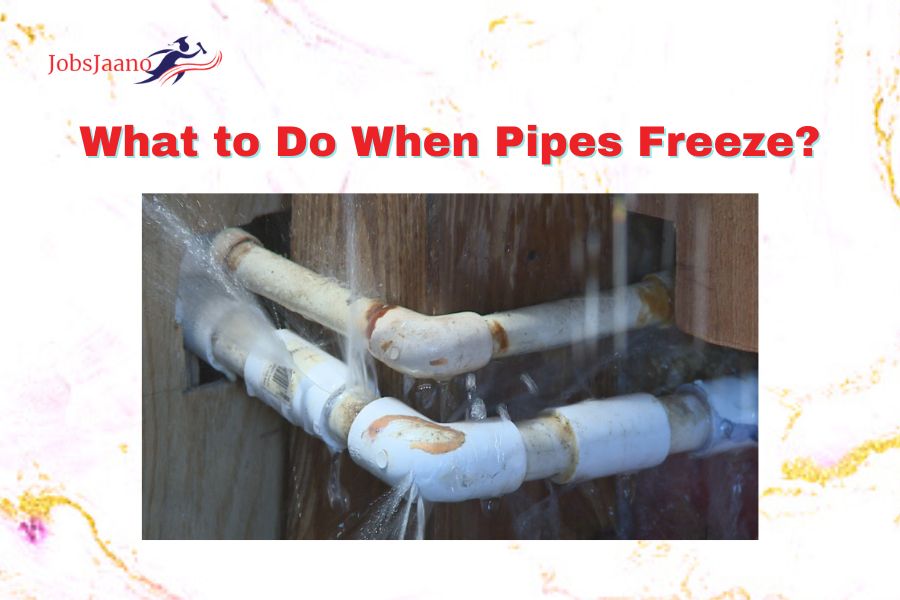
Burst Pipes Repair | Burst Pipes What To Do
Various factors might cause water pipelines to rupture. However, they typically burst when the water inside them freezes and swells, placing too much pressure on them and causing a rupture. To fix a burst pipe, you must first turn off the main water supply before repairing the line.
If a pipe bursts, your top priority should be to do whatever it takes to get it working again as soon as feasible. Many products are easily accessible on the market and can be used to temporarily mend ruptured pipes. They consist of clamps with sleeves, epoxy putty, and fibreglass tape.
Weekend temporary repairs may work, but you’d want to make a long-term solution. No matter what kind of repair you choose, avoid buying repair kits before you know the pipe’s diameter and substance.
Use of epoxy putty is one of the repairs you can try. While epoxy putty will stop a leaky pipe, it is only a temporary solution. Fiberglass tape is frequently used in conjunction with putty and provides a more durable patch when paired with a polyurethane type of glue. Another remedy that has the advantages of being quick and inexpensive is a sleeve and clamp.
One may argue that sealing the leak with a slip coupling is a relatively long-lasting fix, but it necessitates perfectly straight pipes manufactured of a particular material and with a specified diameter. Whatever product you choose, you must use it according to the manufacturer’s instructions; otherwise, it won’t work.
WARNING! Any pipe sections that have already been fixed should be replaced. The repair can begin to leak once more as pipes move naturally.
Do not panic if a pipe explodes. Start by cutting off the pipe’s primary water source. If there is not a shutoff valve close to the leaky pipe, turn off the water supply to your house at the main shutoff valve. Drain any remaining water from the damaged pipe and continue to dry it. To accomplish this, turn on all faucets that are associated with that pipe.
What to Do If Your Water Pipes Burst?
You only need some basic plumbing knowledge to repair a burst pipe. And you will do a lot to prevent the pipe from freezing again with following techniques. What you should do is:
Using a Clamp and Sleeve to Repair a Burst Pipe
Step 1: A copper pipe leak can be temporarily fixed using a clamp and sleeve repair kit. It is simple to find this kit in most neighbourhood hardware stores.
Make sure to disconnect off the main water supply to the damaged pipe before beginning the repair. After that, use a metallic file to smooth off any rough spots near the damaged section.
Step 2: Over the burst, place the rubber sleeve centre. Once the sleeve has encircled the pipe, check that the clamp’s seam is pointing away from the burst.
Step 3: Wrap the rubber sleeve in the metallic clamps that you have taken.
Step 4: To tighten the clamp by its screws, use a screwdriver. Open the pipe’s water supply next. Take note of any leaks. If the leak persists, repeat the procedure and gently adjust the placement of the sleeve.
Get the damaged pipe part fixed as soon as you can, even if the leak stops.
Fixing a Burst Copper Pipe with a Slip Coupling
Step 1: Use a slip coupling if want a better, more durable remedy that is still temporary. Although a copper tube slip coupling is an alternative, a coupling with compression capability is preferable.
The outer diameter of the pipe should match the inside diameter of the tubing. However, soldering is necessary for such a linkage. Start by cutting off the water supply to the leaky pipe before using the coupler.
Mark the pipe’s afflicted part where a replacement is necessary. Add a segment that extends past the ruptured area. You should cut out a portion of the copper piece of the repair connection.
Step 2: The marked cutting line should have the cutter slightly tightened. Form a ring by cutting a line. Instead of spiralling, it ought to be a straight line. The cutter should be tightened a little bit more with each spin. When the copper pipe breaks, halt. the other designated part in the same manner.
Step 3: Use the triangle-shaped cutter blade to round off and smooth any jagged edges on the pipes.
Step 4: Now attach the pipe portions that already cut with the coupling’s compression rings and nuts. The coupler should then be attached to one end of the pipe.
Continue to slide the slip coupling along the pipe. Then, transfer it to the other end. Make sure the repair section is centred inside the coupler, in other words. As you secure the coupling with a pipe wrench, tighten all of the compression nuts using pliers’ pair.
How to Prevent Water Pipe Frozen?
- Close the garage doors if there are water system lines inside.
- Open the doors to the cabinets in the kitchen and bathroom to let warmer air flow around the piping. Make careful to store any hazardous household products up high and away from children’s reach.
- Allow the cold water to trickle from the nozzle that is served by exposed pipes when it is extremely cold outside. The passage of even a small amount of water through the pipe prevents the pipes from freezing.
- Keep the thermostat at the same temperature all day and all night. You can pay more for heating if you temporarily stop using lower nighttime temperatures, but you will save money if pipes don’t freeze and burst.
- When leaving your house during chilly weather, keep the heat on and set it no lower than 55 degrees Fahrenheit.
How to Thawing Pipes?
- Consider a frozen pipe the cause if you turn on a faucet and only a trickle comes out. Against exterior walls or where your water service enters your property through the foundation are likely locations for frozen pipes.
- Don’t close the faucet. Water will start to flow through the frozen section as the frozen area starts to melt as you treat the frozen pipe. Ice in the pipe will begin to melt if water is run through it.
- Apply heat to the pipe piece using a hot water-soaked cloth wrapped around it, an electric heating pad wrapped around the pipe, an electric hair drier, a portable space heater, or an electric hair dryer. Use of a blowtorch, kerosene or propane heater, a charcoal stove, or any other open flame device is strictly prohibited.
- Heat the area until the water pressure is back to normal. Call a qualified plumber if you cannot find the frozen location, if it is inaccessible, or if you are unable to thaw the pipe.
- In order to determine whether you have other frozen pipes, check all other faucets in your house. Other pipes might also freeze if one pipe does.
at what temp do pipes freeze